
Apple’s AirPods are widely used these days with huge demand since it was released several years ago, Apple’s technology is considered one of the main players in the market, thus their AirPods provide convenience to the users through its high-quality sound and comfortable pair of earbuds, however, convenience and quality of sound are not the only factors I am referring here, but, there are some additional tips and tricks that you might not hear before related to Apple’s AirPods I am showing them here to you in this article.
Table of Contents
- How Does Apple's AirPods Work?
- 13 AirPods Tips And Tricks
- Tip 1 – Changing The Name Of Your AirPods / AirPods Pro
- Tip 2 – Set Microphone To Just Left Or Right AirPod
- Tip 3 – Checking The AirPods And Case Battery Charge Level
- Tip 4 – Pairing Your AirPods With Apple Devices Including Mac
- Tip 5 – Pairing Your AirPods With Non-Apple Devices
- Tip 6 – The Status Lights Color Code In The AirPods Charging Case
- Tip 7 – Save Battery Life Of Your AirPods
- Tip 8 – Turn On/Off Automatic Ear Detection On Mac PC
- Tip 9 – Find Your Lost AirPods
- Tip 10 – Using The Double Tap Commands – Turn On/Off Automatic Ear Detection On iOS
- Tip 11 – Share Music And Phone Calls With Friends
- Tip 12 – Finding The Serial Number Of Your AirPods
- Tip 13 – Updating Your AirPods Firmware
- Conclusion
How Does Apple’s AirPods Work?
Basically, they are consist of a charging case (unlike any other earbuds) which is used to pair the AirPods to your iPhone or any other mobile phone, in addition, to being used as a power bank to the AirPods themselves. So, the work method of Apple’s AirPods is to be paired with the mobile phone via the charging case, then use them normally.
Whenever a user finishes using the AirPods, he will put them back into their charging case which will charge both of the pieces immediately, putting in mind that the case itself requires to be charged by Apple’s Lightning cable (for the first generation) or Wireless charging and/or Apple’s Lightning cable (for the next generations).
13 AirPods Tips And Tricks
Rather than what has been said above, I am guiding you for the full 13 features tips, and tricks of Apple’s AirPods just in case you haven’t known about them and will definitely enhance your experience with them.
Tip 1 – Changing The Name Of Your AirPods / AirPods Pro
The first time you pair your AirPods to your iPhone it will take your name and will be displayed inside your iPhone settings as “Your Name’s AirPods“, some like to change this default name into something else for the sake of being organized or just for playing around.
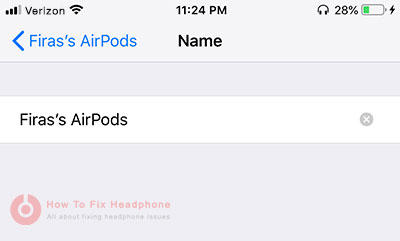
To change the name of your AirPods simply follow the below steps in your iPhone:
- Tap on Settings.
- Choose Bluetooth.
- Tap on the “i” blue icon beside your AirPods name.
- Tap on Name.
- Change the name of your AirPods to anything you like.
Tip 2 – Set Microphone To Just Left Or Right AirPod
As a complementary answer to the question above “How Does Apple’s AirPods Work?” this section could be part of the answer, both of the AirPods have built-in microphones inside of them to be used either with Siri or making a phone call.
One microphone will be functioning at a time and by default the settings set to automatically assign one of the AirPods to have the active mic on it depending on which one you are using separately or which AirPods you wear first or depending on what the iPhone has decided.
You can break this rule, you can assign manually the mic to be active and working on a specific AirPod regardless of the other one’s status, by setting up the mic to be active on one of the AirPods, it will remain on that particular AirPod piece even if you are using only the other piece.
To set the AirPod’s mic manually either to the left or right AirPod simply follow the below steps:
- Open Settings.
- Tap on Bluetooth.
- Tap on the blue “i” icon.
- Tab on the Microphone.
- Set the microphone either to “Always Left AirPod” or “Always Right AirPod” instead of the default “Automatically Switch AirPods“.
Tip 3 – Checking The AirPods And Case Battery Charge Level
There are 4 methods or ways to determine how much battery charge is left in your AirPods, and all of those methods are easy and directly accessible, Apple provides several ways to check the status of your battery levels to give you alternative ways for your convenience to choose which one to use.
To check the battery charge level of your AirPods simply follows one of the below 4 methods:
Method 1 – Opening The AirPods Case
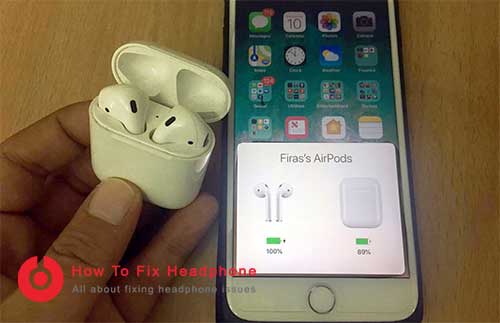
- Place your AirPods into their charging case.
- Keep the lid open next to your iPhone.
- A pop-up will slide in on your iPhone screen that shows how much battery you have left on each AirPod and the charging case.
Method 2 – iPhone’s Notification Center

- Swipe down the Notification Center from the top of your iPhone’s screen (or any iOS device).
- Swipe right to show the Today View.
- Scroll down to see the Batteries widget, you will see the iPhone’s, the Apple’s Watch, and the AirPod’s batteries levels.
Method 3 – Using Your Apple Watch
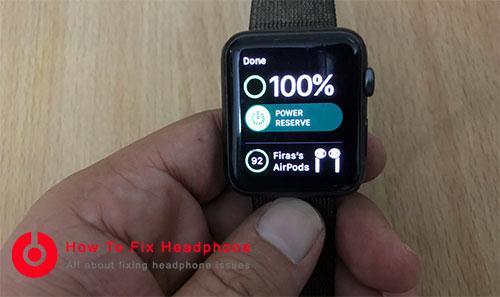
Using your Apple Watch, you can simply identify the AirPods Battery levels.
- Swipe up the Control Center from the home screen.
- Tap on the battery icon while the AirPods are out of the charging case
Method 4 – Using Siri
This is one of the easiest methods to check the Battery level of any Apple accessories or the iPhone itself.
While Siri is active say “AirPods Battery” and you will get the direct answer.
Tip 4 – Pairing Your AirPods With Apple Devices Including Mac
This is a pretty cool tip, not everyone knows that AirPods can be paired with iPhones, iPods, Apple Watches, Mac computers, and Apple TVs.
To Pair Your AirPods With Your iPhone
- Open the AirPods case close to your iPhone.
- Tap the Connect button on the AirPods Control Center card (on your iPhone’s screen).
- Done
How to unpair your AirPods from your iPhone? simply follow the below instructions:
- On your iPhone or iPad, launch the Settings.
- Tap Bluetooth.
- Tap the “i” blue icon beside your AirPods name.
- Tap Forget this Device.
- Tap Forget Device again to confirm.
Unpairing your AirPods from your iPad will only unpair them from your iPad itself, this applies to any of the other Apple devices hence you can re-pair them again at any time.
On iPhone, tap Forget Device again to confirm iCloud removal on other devices.
To Pair Your AirPods With Your iPad
While your AirPods are paired with your iPhone, iCloud will sync the pairing settings to your iPads when you logged in using the same Apple iTunes account.
If you do not own an iPhone but only Apple AirPods and an iPad, then you can follow the same pairing process of pairing with the iPhone described above.
To Pair Your AirPods With Your Apple Watch
As long as you’ve paired your AirPods to your iPhone or iPad, again they will automatically be paired with your Apple Watch as described above.
To Pair Your AirPods With Your Mac Computers
Having your AirPods paired with your iPhone will also pair your AirPods with your Mac, as I stated above that because iCloud syncs the pairing to any Mac computer that runs macOS Sierra or above.
To Pair Your AirPods With Your Apple TV
- Open your AirPods charging case.
- Press and hold the pairing button on the back of the case.
- On your Apple TV, Launch Settings.
- Select Remotes and Devices.
- Select Bluetooth.
- Select your AirPods from the list.
To unpair your AirPods from your Apple TV follow the below steps:
- On your Apple TV, Launch Settings.
- Select Remotes and Devices.
- Select Bluetooth.
- Select your AirPods from the list.
- Select Forget Device.
- Select Forget Device again to confirm.
Tip 5 – Pairing Your AirPods With Non-Apple Devices
Pairing your AirPods with any device rather than Apple devices is pretty easy, it is the same exact process just like when you pair any other Bluetooth headsets or earbuds with those devices such as Android mobiles or tablets, Windows tablets or computers..etc, by following the below steps:
- Open your AirPods charging case.
- Press and hold the pairing button on the back of the case.
- Launch the Bluetooth settings on the device.
- Select your AirPods from the list.
- Confirm the pairing.
Tip 6 – The Status Lights Color Code In The AirPods Charging Case
You need to understand the status of your AirPods in order to deal with them the right way, and this will prevent you from being in a situation when for example you needed the AirPods the most then you discover they need to be recharged.
When you open the lid of the charging case, you will see a small status led light placed between the two AirPods, this status light indicates what is the status of your AirPods.
AirPods Status Light Color Codes
- Green Light: stands for charged
- Amber Light: This means less than one full charge remains.
- White Flashing Light: This means your AirPods are ready to set up with a device.
- Amber Flashing Light: This means you have to set up your AirPods again.
Tip 7 – Save Battery Life Of Your AirPods
When it comes to a battery charge, AirPods are providing around 5 hours of continuous listening experience time per one charge, so, since the AirPod charges quickly in the charging case, you may get benefit from this scenario when you can leave one AirPod piece into the charging case and use the other piece with music or phone calls, this case you will save your AirPods battery life by not using both AirPods together.
Now, this is useful especially when you need to use the AirPods the most for a long while, regardless of the audio you are listening to even if it is a stereo or mono music piece, cause Apple designed the AirPods to play even stereo music on one piece of AirPod when using only one at a time.

Tip 8 – Turn On/Off Automatic Ear Detection On Mac PC
Apple’s Mac computers offer great compatibility with other Apple products such as AirPods, so when you pair your Apple AirPods with your Mac computer you will be having separate controls for the AirPods rather than the ones in your iPhone.
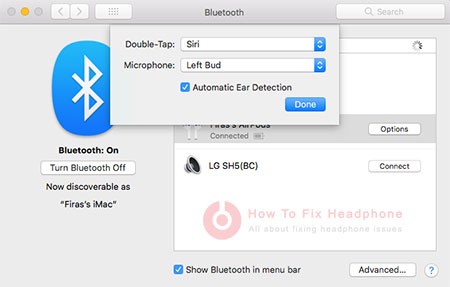
When you have your AirPods paired with your mac, you can play with the double-tap settings, you can customize the Right double-tap or Left double-tap separately, Microphone or Automatic Ear Detection settings in your Mac by:
- Go to System Preferences.
- Select Bluetooth.
- Select AirPods.
- Then choose Options.
You can also switch easily the output volume on the volume icon which is in the menu bar, also connecting your AirPods to your Mac is so easy by tapping on the Bluetooth icon or by opening the Bluetooth menu in System Preferences as described above.
Tip 9 – Find Your Lost AirPods
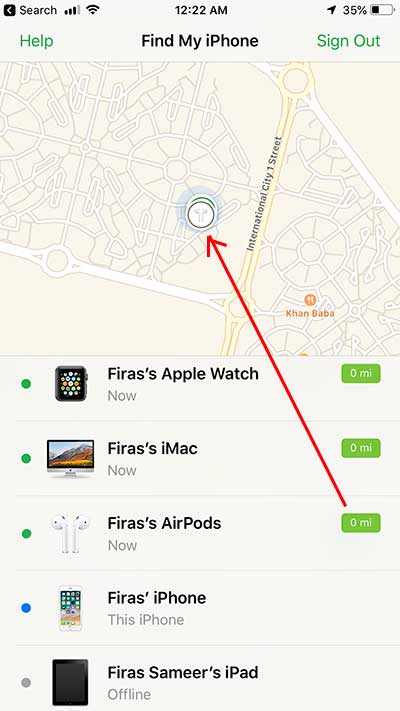
Anyone whos new to Apple AirPods or even if you’ve never had one before and hesitating to purchase them, most probably your hesitation is based on the idea of whether to have the AirPods falling of your ears while walking or jogging, but asking reviewers or someone who owned it previously would change your mind about that.
But you might also think that in case of losing your AirPods along with their charging case! this thought also has been covered in Apple’s invention, they have resolved this matter very easily in case of missing or losing your AirPods, simply use the Find My iPhone app which is very handy to find all your Apple’s products that use the same iTunes accounts.
Tip 10 – Using The Double Tap Commands – Turn On/Off Automatic Ear Detection On iOS
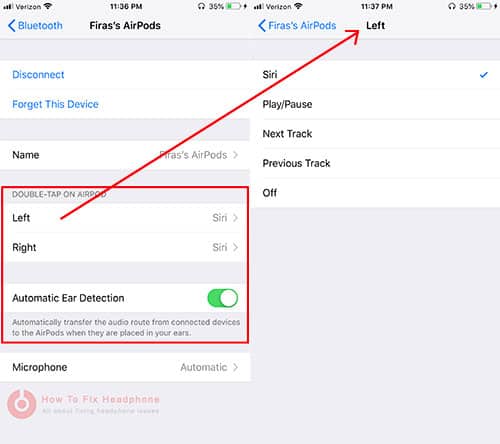
Double-tap functions come in handy in the AirPods settings in your iPhone, with those settings, there are plenty of options to control your Left and Right AirPods separately for what do you want the double-tap to do when using them.
Check those settings by:
- Go to Settings.
- Select Bluetooth.
- Tap on the blue “i” icon beside your AirPods.
- You will find the Double-Tap On AirPod section.
From there you can change the double-tap functions of the left AirPod and the right AirPod, you can switch it to activate Siri, play/pause the music track, switch to the next track or the previous track, or even to deactivating the double-tap feature.
Also, there is an option of Automatic Ear Detection which enables the iPhone or the Apple device to automatically transfer the audio route from the device itself to the AirPods the moment they are placed into your ears, now, if you disable that feature you will have to manually connect your AirPods to your iPhone or the device you are using the AirPods with.
Tip 11 – Share Music And Phone Calls With Friends
This is one of the advantages that Apple AirPods provide which is using each AirPod piece by different users, and what I mean by that you can play music and listen to it with only one piece of AirPod while the other piece you can share with your friend so both of you enjoy the moment.
Having that being said, it’s not only about music, but you can also share a phone call with your friend, as we discussed above that a microphone will be assigned to one of the AirPods (either automatically or manually assigned), so one person is having the call using one AirPod while the other is listening to it via the other AorPod piece.
Tip 12 – Finding The Serial Number Of Your AirPods
Nowadays there are plenty of fake products that buyers are being scammed with every day, the fake AirPods products which are cheaply made have very close characteristics in terms of feel and look of the product which made an average user identify the real Apple AirPods out of the fake ones, very hard.
So, how to discover and confirm the real AirPods from the fake ones easily! simply by using the serial number and checking its validity on Apple’s website.
Where to find Apple’s AirPods serial number?
There are 4 different ways to find the serial number of your Apple AirPod.
Method 1 – Using iPhone Setting
While your AirPods are connected to your iPhone, check the serial by:
- Go to Settings.
- Then General.
- Tap on About.
- Then tap on AirPods for the serial number.
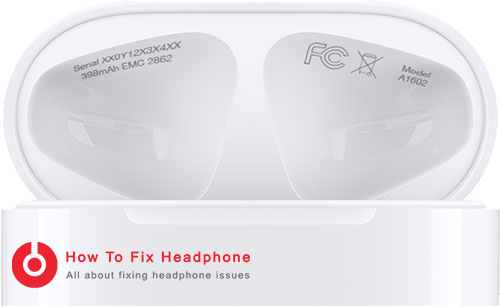
Method 2 – Using AirPods Charging Case
Simply, open the AirPods’ charging case lid and look inside of it you will find the serial number along with some production details there.
Method 3 – Using AirPods Original Packaging
Find the serial number by the barcode.
Method 4 – Using The Original Invoice
In case the original invoice of your AirPods is easy to find, this is an option to find the serial number.
Once you got the AirPods serial number, visit Apple’s Coverage Checking page from the below link and enter the serial number you got, then hit the Continue button:
Tip 13 – Updating Your AirPods Firmware
Apple releases a firmware update for their AirPods every few months, as long as they are releasing an update that means they are enhancing the functionality of the AirPods for a better experience and to clear all the bugs and issues they might discover.
So be sure to have your firmware updated every now and then although the AirPods should have updated automatically whenever there is an update as long as they are in the charging case beside a synced iPhone.
It is a good idea to check your firmware version and whether if it is being updated or not by:
- Go to Settings.
- Tap General.
- Then About.
- Then tap AirPods.
- Trigger a firmware update.
Make sure that your AirPods charging case has a sufficient charge level or leave it charging next to your iPhone.
Conclusion
Apple AirPods are highly demanded in the market for the quality of the made and output sound, they provide a solution for every individual need in different circumstances, so understanding what features the Apple AirPods are offering is a good idea in order to get the most out of them on your daily usage.
Share this article below if you believe others need to know about it … 🙂
Recent Posts
Is Wireless Audio Transmission Not Reliable As Wired Headphones?
Yes, wired headphones are more reliable than wireless audio transmission, as wireless headphones' connection might drop from time to time, as well as it is much more dependent on batteries compared...
As a rule of thumb and the World Health Organization, each person should use headphones at less than 60 percent volume for 60 minutes a day. That’s the safest route you can take for the usage of...
